Most of the time your WordPress site will chug along happily, but when it breaks, the information available to you is limited. Debugging your WordPress site to find errors is a pretty simple thing.
Trouble shooting any issues on your WordPress site becomes much easier if you put your site in debug mode. In this post I will tell you how to do that so you can get to the root of your problems more quickly.
Hidden Messages
By default WordPress or more correctly the underlying scriptng language php, hides it’s error and warning messages. It does this because many of the messages are just warnings and don’t need to be seen.
Enabling debug shows all these messages and more importantly shows any real errors that are happening on your site.
Frustrating White Screen Of Death
One of the most frustrating things that WordPress does is it’s white screen of death, when WordPress crashes it closes down and only shows a white screen, no messages, no warnings just a white screen.
When you enable debugging it shows those messages, it tells you which plugin is causing issues, it will tell you if you are out of memory, it will say which theme file is causing problems.
How To Enable Debugging
To enable debugging on your site you need to edit a file in the root of your site called wp-config.php.
Connect to your site using ftp and go to the root, you will see the file wp-config.php, edit that file and look for this entry
define( ‘WP_DEBUG’, false );
Change the false to true and debug is active.
Plugins
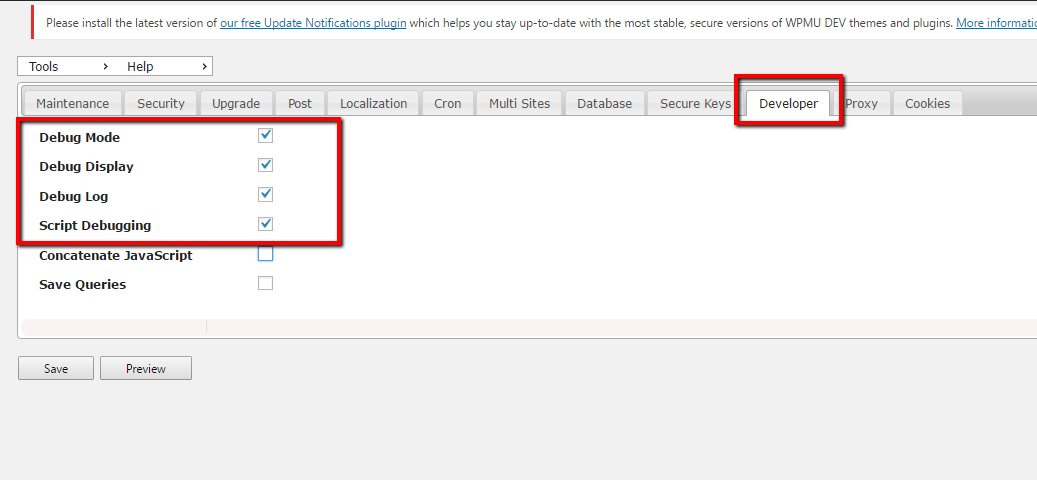
If you are not happy editing your wp-config there is a plugin that will enable debugging for you, it’s called WP Config File editor and can be downloaded from this link,.
https://en-gb.wordpress.org/plugins/wp-config-file-editor/
Once installed go to WPCF Editor menu -> Developer and click the following options, debug will be activated.
What You Will See
First up don’t panic, your site will start to throw out lots of messages (a lot of messages) your site will look terrible, enabling debug is designed to be a temporary measure to debug your site.
All messages will be output, the important thing to note is the last message to appear on your screen will be the offending one, usually a fatal error message.
It’s hard to go into depth about the message but it will point to a theme file, plugin file or other error message.
Log File
If you have an intermittent issue, then you can enable a logging option and all messages will be sent to a log file at /wp-content/debug.log so you can review it at leisure when an error happens.
The important thing to note is that messages are sent to the log not to the screen so your site will look normal while collecting data. To do this add some additional content to your wp-config file
// Enable Debug logging to the /wp-content/debug.log file
define( ‘WP_DEBUG_LOG’, true );
// Disable display of errors and warnings
define( ‘WP_DEBUG_DISPLAY’, false );
@ini_set( ‘display_errors’, 0 );
// Use dev versions of core JS and CSS files (only needed if you are modifying these core files)
define( ‘SCRIPT_DEBUG’, true );
All message will then be sent to a file called /wp-content/debug.log.
Please note a lot of information is sent to the log and hte file can get pretty large pretty quickly.
A useful plugin to read the log from inside your wordpress dashboard is https://wordpress.org/plugins/debug-bar/
Wrap Up – Debugging Your WordPress Site
Debugging your WordPress site helps troubleshoot your WordPress issue, if you are still stuck, tell us the problem and we can fix it as on of our WordPress technical support jobs.


